Shell access via ADB
Вы можете включить режим разработчика на своём UBports устройстве и получить доступ к оболочке Bash с вашего ПК. Это полезно для отладки или более расширенного использования оболочки.
Установка ADB
Во-первых, нужно установить ADB на компьютер.
On Ubuntu:
sudo apt install android-tools-adb
On Fedora:
sudo dnf install android-tools
And on macOS with Homebrew:
brew install android-platform-tools
Если работаете в ОС Windows, скачайте пакет программ для работы в командной строке здесь.
Включение режима разработчика
Далее нужно включить режим разработчика.
Переведите устройство в режим разработчика (Настройки системы - Сведения - Режим разработчика - установите флажок, чтобы включить его)
Перезагрузите устройство
Plug the device into a computer with ADB installed
Откройте терминал и введите
adb devices.
Примечание
Когда Вы закончите работу с оболочкой, рекомендуется снова выключить режим разработчика.
If there’s a device in the list here (The command doesn’t print «List of devices attached» and a blank line), you are able to use ADB. If not, continue to the next section.
Authorize access to the device
When using adb for the first time on a computer, the following dialog will appear when you unlock the screen.
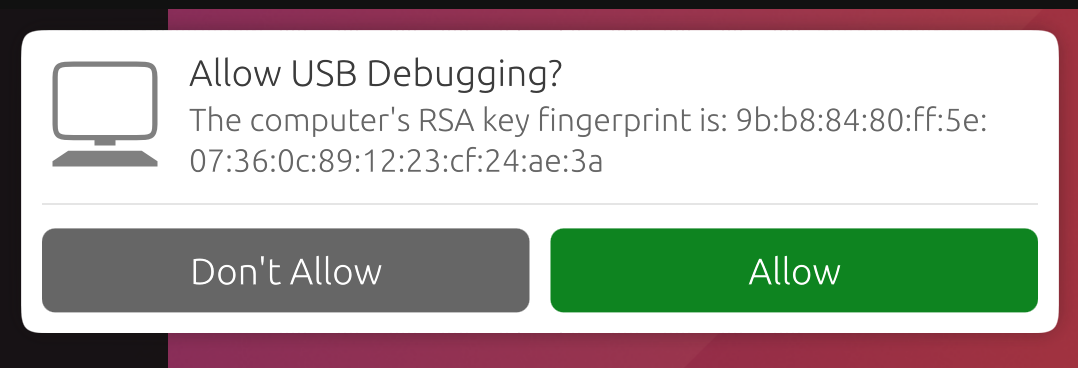
This ensures that ADB commands will not work on a new computer unless user unlock the phone and acknowledge the dialog. Selecting «Allow» will make the ADB commands work for this session, and will also remember this computer so that it won’t prompt you again in the future.
Примечание
If you’re bringing up a port and you require ADB access before the UI is available, you can disable this protection by editing /etc/default/adbd and change ADBD_SECURE=1 to ADBD_SECURE=0.
Frequently used ADB commands
ADB shell commands:
adb shell — Gives you access to the Linux command-line shell on your device.
adb shell [command] — Runs the specified shell command on your device.
Additional Adb commands:
adb push [source] [destination] — Pushes a file from your computer to your device.
adb pull [destination] [source] — Pulls a file from your device to your computer.
For more ADB commands, refer to the official documentation.
Добавьте номера (ID) устройства
ADB не всегда может определить, к каким устройствам на Вашем компьютере следует обращаться. Вы можете вручную добавить устройство, которое ADB не может найти самостоятельно.
Just run the command for your selected device if it’s below. Then, run adb kill-server followed by the command you were initially trying to run.
Fairphone 2:
printf "0x2ae5 \n" >> ~/.android/adb_usb.ini
OnePlus One:
printf "0x9d17 \n" >> ~/.android/adb_usb.ini